How to configure an S3 bucket and the corresponding IAM policy for the W3 Total Cache Wordpress plugin
W3 Total Cache CDN with S3 Bucket and Cloudfront as a CDN
Last week I setup a simple CDN for a Wordpress website. After some googling I discovered that W3 Total Cache has a CDN component that can use AWS S3 and Cloudfront as the cloud provider. W3 Total Cache is a free cache plugin for Wordpress that I have used on a few projects. It has a very robust configuration mechanism and I highly recommend it. However, when configuring the CDN, I followed the top Google results but couldn't get W3 Total Cache to connect to the S3 bucket. Here are my steps.
Create an S3 Bucket with Some Public Permissions Settings
From the S3 Buckets dashboard, click "Create bucket".
Under "General Configuration" Give it a Name, and choose a Region (the default is probably fine). Copy the name to a temporary location for use later.
The important part for W3 Total Cache to access your bucket is to configure the correct public permissions. Under "Bucket settings for Block Public Access" you need to uncheck "Block all public access" and then uncheck the top two options. Your configuration should look like this:
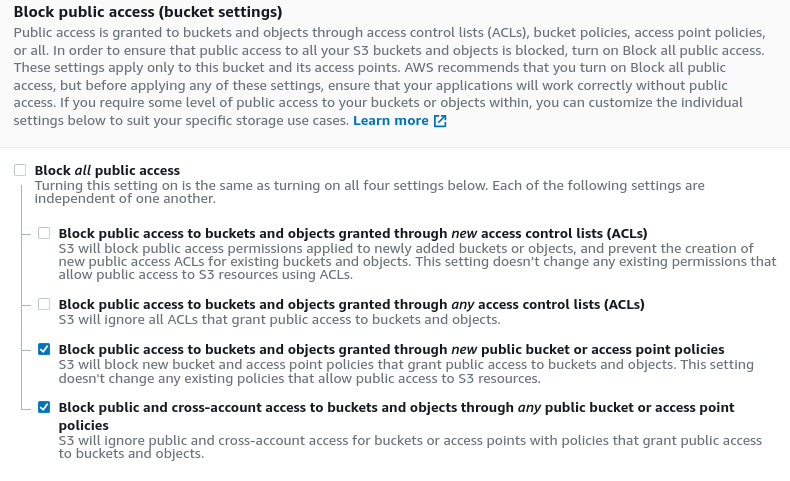
I left the rest of the options as default and created my bucket.
If you already created your bucket, you can edit the permissions by clicking the Permissions tab when you are viewing a bucket when you click the name in the "Buckets" table.
Create an IAM JSON Policy
The next part is configuring an IAM policy that works with W3 Total Cache.
I would create the Policy first, and then you can add the policy to a new user.
Go to the IAM dashboard and click Policies in the left menu. Click the blue "Create policy" button at the top.
Click the JSON tab. Paste the following into the JSON editor. You must change YOUR_BUCKET_NAME on lines 8 & 9 to the S3 bucket name that you created above.
{
    "Version": "2012-10-17",
    "Statement": [
        {
            "Effect": "Allow",
            "Action": ["s3:DeleteObject", "s3:Put*", "s3:Get*", "s3:List*"],
            "Resource": [
                "arn:aws:s3:::YOUR_BUCKET_NAME",
                "arn:aws:s3:::YOUR_BUCKET_NAME/*"
            ]
        },
        {
            "Effect": "Allow",
            "Action": "s3:ListAllMyBuckets",
            "Resource": "arn:aws:s3:::*"
        },
        {
            "Effect": "Allow",
            "Action": ["cloudfront:ListDistributions"],
            "Resource": "*"
        }
    ]
}
The first Statement block allows W3 Total Cache to Delete, Put, Get, and List the objects or files in your bucket. The Resource section limits these permissions to just this specific bucket (thus the need to set YOUR_BUCKET_NAME).
The next two Statement blocks are a little odd. W3 Total Cache requires that you allow it to ListAllMyBuckets for the S3 API and then you must also allow it to ListDistributions for Cloudfront. These are both odd, because if you configure it correctly, W3 Total Cache should never need to do these operations: you can configure the CloudFront name directly, and therefore these two permissions seem like they shouldn't be necessary. But without them W3 Total Cache will fail to connect, so they are used somewhere.
Click "Review Policy", give it a Name, and maybe a brief Description so you can identify it later. You will need the Policy name in the next step so make a note of it. Then click "Create Policy".
Create an IAM User
Click Users in the left menu of the IAM dashboard. Click the "Add User" button.
Add a "User name", and then click the "Programmatic access" checkbox. Click the "Next: Permissions" button.
Click the "Attach existing policies directly" box. In the Filter, type the name of the policy you created above. Click the checkbox next to the policy and click "Next: Tags".
Add tags if you want and then click "Next: Review", then if everything looks good click "Create user".
On the next screen you should copy the "Access key ID" and "Secret access key" into a temporary location so you can use them when you setup W3 Total Cache.
Create a CloudFront Distribution
Go to the CloudFront Distributions dashboard.
Click "Create Distribution". Choose the "Get Started" button under the Web section.
Set the Origin Domain Name to the S3 bucket that you configured earlier. Most of the other settings can be left as default.
If your website has SSL configured you should set the "Viewer Protocol Policy" to "HTTPS Only"
W3 Total Cache uses compressed objects, so you should also change "Compress Objects Automatically" to Yes.
Click "Create Distribution".
The State column will change to Enabled when the CloudFront distribution is configured. In the mean time you can setup W3 Total Cache. Copy the Domain Name from the CloudFront Distributions table for the one you just created, you will need this later.
Configure W3 Total Cache
Login to your Wordpress Admin and install the W3 Total Cache plugin.
After you have activated W3 Total Cache mouseover the Performance option in the left menu and click the CDN option.
Scroll down to "Configuration: Objects". Paste the "Access key ID" and "Secret key" from the IAM user step above. Put the bucket name in the "Bucket:" field and set the region to the one you selected when you created the bucket. Paste the CloudFront "Domain Name" that you copied from the table in the step above.
Click "Test S3 upload & CloudFront distribution". If everything is configured properly it should say "Test passed".
You can now configure how you want W3 Total Cache to handle your assets. This is really a custom choice and you can follow the W3 Total Cache documentation for best practices.